This section allows you to view all posts made by this member. Note that you can only see posts made in areas you currently have access to.
Messages - zipdragon64
Pages: 1 2 3 [4] 5 6 7 8 9 10 11
61
« on: July 05, 2010, 06:50:39 AM »
thats what i plan on doing, and i cant wait to see some of the weapon to weapon impacts at that speed
62
« on: July 03, 2010, 09:46:05 AM »
getting ready for pa bot blast
63
« on: July 02, 2010, 12:03:09 PM »
oh ok thats an easy one. i have a 6ch gws and a 5ch spektrum, so for the gws i put the drive motors on ch's 2&3 this allows for me to have tank drive left stick controls the left motor fw/bk and the right stick controls the right motor fw/bk then i put the weapon motor on one of the top switch's ch's either 5 or 6 ( i usually pick 5 but thats personal preference) and that leaves 3 ch's unused. the spectrum is a different story, it doesn't have two center spring sticks so i put the motors on ch's 3&4 and use the mixing to make it drive some what rc car like, fw on the stick is fw both motors bk is bk, left makes it turn left and so on. then i put the weapon on ch 2. now i don't like this set up because i like to tank drive my bots but it does allow for a very refined control of the weapons speed vs the gws were you have half speed or fully speed 
64
« on: July 02, 2010, 11:28:44 AM »
im not sure what you mean
65
« on: July 02, 2010, 10:54:03 AM »
ok back to work so here are all the components i use in my antweights, if necessary i will post links to all of them but for the time being i will just post the pics 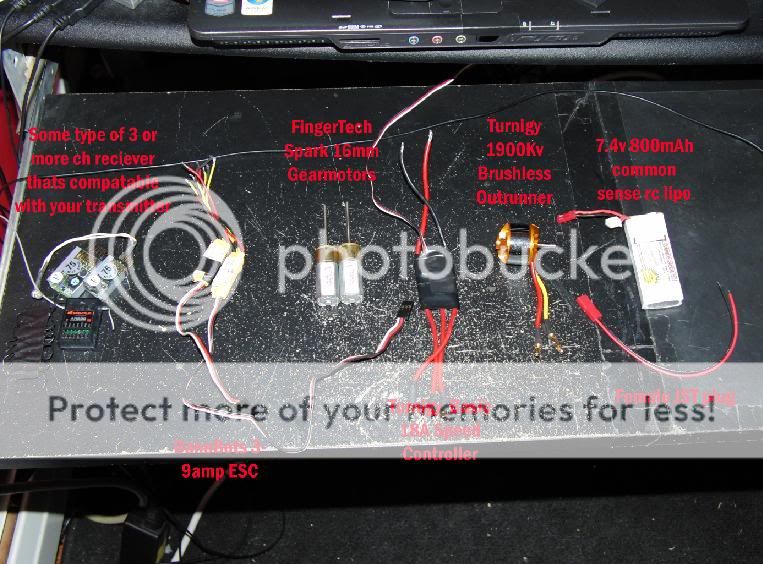 ok wiring a robot is very simple, especially if you already know how to solder. I wire both my beetle weights and antweights just about the same way with one minor difference but ill get to that later. The method i use is called wiring in parallel, what this means is that the same voltage is applied to each component. heres what your parallel wiring diagram looks like  now it may look complicated but its rather simple, the way to do this with all the components ive laid out is to group all the negative leads and solder them to the negative lead of the jst plug and group all the positive leads and solder them to the positive lead of the jst plug. then simply solder your motor connections and your pretty much good, all thats left to do is plug everything in to your receiver. you can figure out what you want on what controls through a little trial and error, if its not right then you simply power off and change the plug port, if a motor is spinning the wrong direction simply change the dip switch on your controller for that channel, or on a spektrum adjust the mixing. if the brushless motor is spinning the wrong direction simple unplug two of the three wires that connect to the motor and switch them, its that simple. heres what it should all look like  and Questions? comments?
66
« on: June 26, 2010, 06:20:05 AM »
well the UK has roaming robots and antweight world series, as far as Texas goes theres none that i know of
67
« on: June 24, 2010, 06:02:16 AM »
sorry i haven't been able to get to it, im on vacation and away from all my stuff but as soon as i return ill finish the wiring tutorial
68
« on: June 17, 2010, 10:00:00 PM »
robot market place is ok for somethings, but most of there stuff is a little over priced, as far as a kit is concerned there isn't really any one good one the robot markets place kit is way over priced and doesn't give you much structure to work off of, sure they give you some carbon fiber but that's only good for some things. i wouldn't build an entire robot out of it that's for sure. and the inertia labs kit has very little room to work off of, anything you add will be right on top of the robot and throw off its balance. plus i don't care for the long wheel base, wast a lot of time and energy turning. the best kit i guess would have to be the finger tech kit, it has a weird look but gives plenty of room in the front to add weaponry, it could very easily be turned into a undercutter or vertical spinner without much effort, you could even turn it into a wedge with little effort in desired none of these kits come with a weapon system though the best combo that i know know of for both price and performance would be a turnigy 1900 kv outrunner with a turnigy 18amp speed controller. same system i use in all my ants http://www.hobbycity.com/hobbycity/store/uh_viewItem.asp?idProduct=2110&Product_Name=TR_28-26_16A_1900Kv_Brushless_Outrunnerhttp://www.hobbycity.com/hobbycity/store/uh_viewItem.asp?idProduct=2168&Product_Name=TURNIGY_Basic_18A_v3.1_Speed_Controller
69
« on: June 17, 2010, 02:25:11 PM »
the reason is what you have shown off hasn't been a very good show of the abilities you clam to have. if you had shown actual robots rather then boxbots or string bots every time you clam to have built something we might have a little more respect for you
70
« on: June 17, 2010, 04:29:31 AM »
yup though i would just post a full thing here so everyone can read through it 
71
« on: June 17, 2010, 02:53:43 AM »
im working on a quick little picture tutorial on how i wire up my ants but it may be another day because i seem to have misplaced something i need for the pics =P
72
« on: June 15, 2010, 04:19:03 AM »
lol and im only in the cheap stuff now, just wait till i start talking about milling and lathing applications. i spent 800 on a lathe and 500 on a mill =P, best decisions i ever made
73
« on: June 15, 2010, 03:54:55 AM »
well for just a drive-able bot you could just use the scorpion XXL http://www.robotpower.com/catalog/ very simple to wire, in fact all you would have to do is solder wires to your motors then tighten the terminals down on the other end of the wires, that simple. if your simply not sure how to solder properly watch this quick little beginners tutorial How to Do It: Basic Soldering
74
« on: June 15, 2010, 03:43:44 AM »
i though i would make this thread because i find that the problem here is not a lack of ambition or creativity, but a lack of knowledge. so I'm going to start by post helpful videos and links on basic things that you need to know to build a basic combat robot lets start with Soldering when i first started soldering i didn't know how to do it properly, i always tried to over tin the tip then join the two joints with the excess on the tip. this of course never worked, and ill explain why, when soldering the solder is drawn to where the heat is and sense the heat at the tip of the iron it was drawn to the tip, not the wire. so in order to solder properly you want to tin the tip (coat it thinly with solder), wipe off the excess on a damp sponge, then use the tip to heat the joint, and when the joint is hot enough apply you solder till evenly coated. see video for fully demonstration How to Do It: Basic Solderingnotes: Make sure you use rosin core solder, if you use the wrong kind of solder (acid core, meant for plumbing) because if you do your joints corrode within a short time of soldering them Cutting Plastics I generally use a table saw and a cut off saw with a fine tooth blade for all my right angle cuts. And i use a saber saw for angled, or curved cuts, and i have sometimes used my milling machine with an 1/8 end mill to do fine cuts and rounded cuts with my rotary table. the this to remember when making cuts is to follow all the standard rules of the machine you are using anyway here's a pretty good overview, although you will never use the first method because you will never use acrylic in a combat robot, and you can ignore the end because the point is the tutorial is to demonstrate how to do it yourself rather then to pay for someone else to do it for you Drilling and Tapping both Plastics and Metals when using a drill press the key thing to remember is the slower the better, especially with larger drill bits and harder metals. No matter what your drilling you want to make sure your piece is securely clamped or bolted down, NEVER try and hold the piece your drilling if the bit catches and spins the piece it will hit your hand several times before you could even think about moving out of the way. when drilling a hole you want to make 1/16" to 1/4" deep pushes depending on the material then back out clearing the chips and debris, don't try to force the bit, just apply moderate pressure and let the bit cut at its own speed, this is important when drilling plastic because if you push to hard or fast you will simply melt the plastic, it is also important when drilling metals because if you force the bit to hard or to fast is will simply dull or break. when tapping first make sure your hole is the appropriate size (see drilling and tapping chart:http://www.shender4.com/thread_chart.htm) then apply an appropriate amount of tapping fluid then begin the tap, gently push the tap into the hole and slowly turn the tap till it begins to catch, then continue driving the tap in, turning the tap about 1/2 turn out every full turn in. this breaks of the burs and clears chips. never try to force the tap for you may break it and always make sure the tap is directly in line with the hole or it will simply create warped threads Cutting Metals how you cut metal all depends on the type of metal your cutting, aluminum should never be cut with a standard metal cut off saw or gridded because the aluminum will build up on the wheel, make it off balance, and eventually blow apart causing serious injury or even death to the operator. the best method for cutting aluminum would be to use a band saw with the proper teeth per inch, a sawzall saw also with the proper teeth per inch, or even just a standard hacksaw. when using a band saw make sure the the guards are properly adjusted, and when using a sawzall or hacksaw make sure you piece is secured properly. A hacksaw is a standard hand tool that is easy to use but can still be dangerous if not used properly, in order to use a hacksaw properly you want to take long even strokes using the full length of the blade at a rate of about 40 strokes per minute so not to where out one spot an quicker then any other. when reaching the end of a cut you will notices an change in pitch at this time you will want to slow down so when you finish the piece off you won't cut your self on the burr. also always make sure both hands or holding the hacksaw this way you will never slip and cut yourself. you can cut steel all the same ways you cut aluminum as long as its hardness is not greater then the blade you are attempting to cut with. in edition you can also cut steel with a metal cut off saw band saw sawzaw cut-off saw i think thats about enough for now if you have any specific questions please post them here and i will discuss what i know, i have over 5 years machining experience and would be more then happy to share my knowledge on the subject so if there is something your not sure how to make just ask and dont forget to always wear your safety glasses, you only have one set of eyes and i would hate yto see you lose them over something stupid like cutting a 5 dollar piece of metal
75
« on: June 15, 2010, 01:39:26 AM »
its clear that you don't know what you talking about but thats besides the point, back on topic fotepx, what you need in order to build a proper UK FW is read fully through the FRA rules first http://www.fightingrobots.co.uk/documents/Build_Rules_2008_v2.pdf when you have done that and your design fits all those aspects you can begin building. for your frame and armor i would have to recommend 3mm to 6mm 4130 chromoly steel, or 7075 aluminum. the steel will be heaver but much easier to weld you can simply have someone arc or meg it for you, were alu welding is much more difficult and far less people are skilled at it. for a drive system 2 to 4 18v drill motor drives should work great depending on what your trying to do with your robot, you will also need a speed controller for them a scorpion XXL should work wounders. and a 6 pack of A123 to power it all should do the trick. as for your weapon your best bet would be using some solenoids powered by some massive capacitors but you would have to do alot of electronics homework first
76
« on: June 14, 2010, 07:36:09 PM »
your brushed ff-030 motor with the prop attached to a piece of depron foam does not qualify as a combat robot because it does not show controlled forward movement, all it can do is spin uncontrollably. it is "something" but you would not be able to compete with it at any normal competitions other then to teach you Humility. as for the sumo bot statement, sumo bots by the standard rule set are autonomous, so you wouldn't control them. plus you will never need more then two channels to drive a sumo bot, no matter how many drive motors you are using one channel for right side forward/back, and another for left side forward/back
77
« on: June 14, 2010, 03:09:35 PM »
you mean that piece of paper with the fan scotch taped to it, I'm sorry but you need to have controlled linear movement in order for that to qualify, witch it does not. i will give you some credit, at least you have something RC now, but you might have better luck with wheels next time
78
« on: June 14, 2010, 02:31:53 PM »
OK the reason i said what i said was to try and save you from wasting 400$ on something that wouldn't work, even now the sumo bot kit your looking at wouldn't hold up very well its not designed for huge impacts, its designed for pushing. I'm just trying to give some advice to help you from wasting your time and money.
oh and for the record Sparkey98 i have built over 11 combat robots in the past 2 years, all of witch, even my crappiest designs, trump your cardboard boxes ten fold. in the past 4 competitions I've been to I've won 3 1st 2 2nd and a 4th, videos are on youtube, and no there aren't any strings attached to my bots
you can take your advice from Sparkey98 if you like but but wouldn't you rather have someone with real credentials give you help
sorry if i have come come off cocky but its frustrating that you would rather listen to a kid that does this
rather then the person that does this
79
« on: June 13, 2010, 01:11:57 PM »
a FW is 30 pounds, that track kit is designed to handle about 5 pounds plus it was not designed with combat in mind. try starting smaller and more basic
80
« on: June 09, 2010, 11:30:58 AM »
oh then it should only cost you like 200 euro to build a 4'x4' and you should be able to get away with using 1/8" to 3/16" poly
Pages: 1 2 3 [4] 5 6 7 8 9 10 11
|